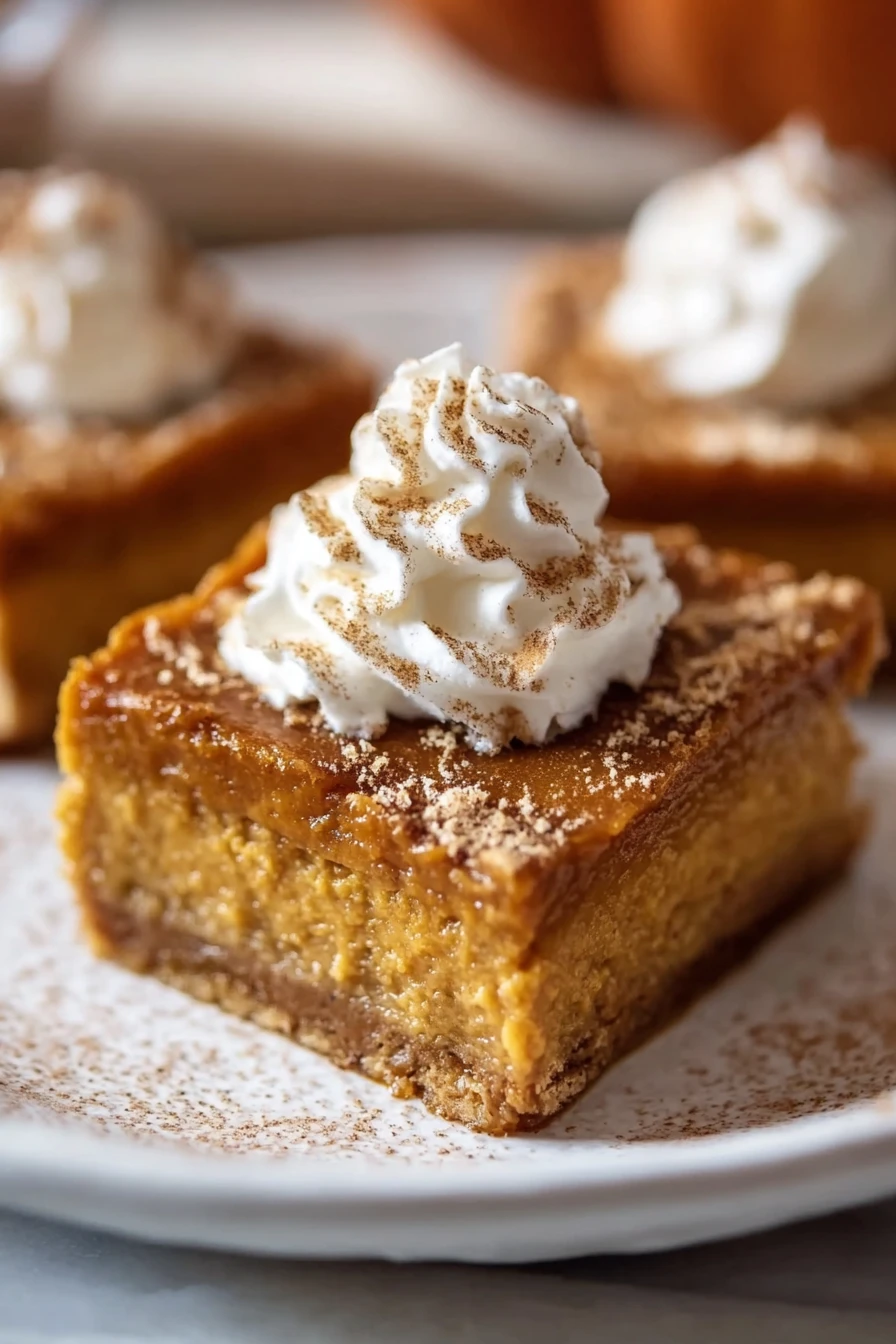
Pumpkin Pie Bars
Hey there, fellow food lovers! I’ve got something special to share today that’s been a game-changer in my kitchen during the fall season: Pumpkin Pie Bars. These little squares of autumnal bliss are like a hug in dessert form, and I can’t wait to tell you all about them.
A few years back, I stumbled upon the idea of making Pumpkin Pie Bars while trying to whip up something for a last-minute Thanksgiving potluck, and let me just say, they were a hit with my family (even my picky uncle who claims to hate pumpkin!).
I remember that first batch vividly. I was a bit of a hot mess in the kitchen, juggling a million things, but when those Pumpkin Pie Bars came out of the oven, smelling like cinnamon and cozy vibes, I knew I’d found a keeper. Now, they’re a staple every fall, and I’m thrilled to pass this recipe on to you.
If you’re looking for a dessert that’s easier than pie (pun totally intended) but still screams holiday cheer, these Pumpkin Pie Bars are calling your name. Stick with me, and I’ll walk you through every step to make them just as irresistible in your home.
Why You’ll Love This Recipe
I’ve found that Pumpkin Pie Bars strike the perfect balance between indulgence and simplicity, and that’s why I keep coming back to them. They’ve got all the creamy, spiced goodness of traditional pumpkin pie but in a handheld, crowd-pleasing format that doesn’t require rolling out fussy pie dough. Plus, in my kitchen, they’re a guaranteed way to impress without breaking a sweat.
What really seals the deal for me is how versatile these bars are. Whether I’m baking for a family gathering or just craving a sweet treat with my afternoon coffee, Pumpkin Pie Bars always fit the bill. Trust me, once you try them, you’ll be hooked too!
Ingredients List
Alright, let’s talk about what you’ll need to make these scrumptious Pumpkin Pie Bars. I’m a stickler for quality ingredients because, in my experience, they make all the difference in getting that melt-in-your-mouth texture. I usually buy my pumpkin puree from a trusted brand, but if you’ve got homemade, even better!
Here’s the breakdown, split into two parts for clarity since we’ve got a crust and a filling to tackle. I’ve included exact measurements because, let’s be real, baking is a science, and I don’t want you to end up with a flop on your hands.
For the Crust
- 1 1/2 cups (180g) graham cracker crumbs, finely ground for a sturdy base
- 1/4 cup (50g) granulated sugar, to add a touch of sweetness
- 1/2 cup (115g) unsalted butter, melted, to bind it all together
For the Filling
- 1 can (15 oz or 425g) pumpkin puree, pure and unsweetened for that authentic fall flavor
- 3/4 cup (150g) brown sugar, packed, for a rich, caramel-like depth
- 2 large eggs, at room temperature, to help the filling set
- 1 cup (240ml) heavy cream, for that luscious creaminess
- 1 teaspoon vanilla extract, to enhance all the flavors
- 1 1/2 teaspoons ground cinnamon, because Pumpkin Pie Bars need that warm spice
- 1/2 teaspoon ground nutmeg, for a cozy kick
- 1/4 teaspoon ground cloves, just a pinch for complexity
- 1/4 teaspoon salt, to balance the sweetness
I prefer using heavy cream over evaporated milk in my Pumpkin Pie Bars because it gives a richer texture, but hey, use what you’ve got on hand. Also, if you’re feeling fancy, freshly grated nutmeg is a total game-changer. Let’s move on to some fun ways to switch things up!
Variations
One of the things I adore about Pumpkin Pie Bars is how easy they are to tweak depending on my mood or what I’ve got in the pantry. I’ve experimented with a bunch of twists over the years, and honestly, it’s hard to go wrong. Here are some of my favorite variations to spice up your Pumpkin Pie Bars experience (sometimes literally!).
- Chocolate Swirl: Drizzle melted dark chocolate over the top before baking for a decadent touch. I tried this once for a holiday party, and it was gone in minutes!
- Pecan Crunch: Sprinkle chopped pecans over the filling for a nutty bite. My husband always asks for this version.
- Ginger Snap Base: Swap graham crackers for crushed ginger snaps in the crust for extra zing. It’s a fun twist I stumbled upon last fall.
- Maple Glaze: Mix 2 tablespoons of maple syrup into the filling for a subtle sweetness. This one’s a personal fave.
- Cream Cheese Layer: Add a layer of sweetened cream cheese between the crust and filling for richness. My kids go nuts for this!
- Spiced Whipped Cream: Top your Pumpkin Pie Bars with whipped cream dusted with extra cinnamon. It’s like a little cloud of heaven.
- Gluten-Free Option: Use gluten-free graham crackers or almond flour for the crust. I made this for a friend once, and she loved it.
- Extra Pumpkin Power: Bump up the pumpkin puree by a couple of tablespoons for an even bolder flavor in your Pumpkin Pie Bars. I do this when I’m craving that full-on fall vibe.
Feel free to play around with these ideas. Half the fun of baking is making it your own, right?
Servings and Timing
Let’s chat about how much time you’ll need to whip up these Pumpkin Pie Bars and how many folks you can feed with one batch. In my experience, timing can vary a bit depending on your oven, but I’ve got the averages down pat after making these a million times. Here’s the breakdown for planning your kitchen adventure with Pumpkin Pie Bars.
- Prep Time: 15 minutes
- Cook Time: 40-45 minutes
- Total Time: About 1 hour, plus cooling
- Servings: 12-16 bars, depending on how generous you’re feeling
I usually cut mine into 16 smaller squares if it’s for a party, but at home, we’re more likely to slice big ol’ chunks. You do you!
Step-by-Step Instructions
Now, let’s get down to the nitty-gritty of making these Pumpkin Pie Bars. I’m gonna walk you through each step like I’m right there in the kitchen with you, sharing all my little tricks to make sure they turn out perfect. I’ve made these so many times, I could probably do it blindfolded (okay, maybe not, but you get the idea).

Step 1: Preheat and Prep
First things first, preheat your oven to 350°F (175°C). Line an 8×8-inch baking pan with parchment paper, leaving some overhang for easy lifting later. I learned this the hard way after wrestling with stuck bars once—parchment is your friend!
Step 2: Make the Crust
In a medium bowl, mix the graham cracker crumbs, sugar, and melted butter until it looks like wet sand. Press this firmly into the bottom of your pan using the back of a spoon or a measuring cup. Pop it in the oven for 8 minutes to set, then let it cool a bit while you work on the filling for your Pumpkin Pie Bars.
Step 3: Whip Up the Filling
Grab a large bowl and whisk together the pumpkin puree, brown sugar, eggs, heavy cream, vanilla, cinnamon, nutmeg, cloves, and salt. Stir until it’s silky smooth—don’t skimp on the mixing here. I like to give it a taste to make sure the spices are just right for my Pumpkin Pie Bars.
Step 4: Assemble and Bake
Pour the filling over your pre-baked crust, spreading it out evenly. Bake for 40-45 minutes until the center is mostly set but still has a slight jiggle. You don’t want to overbake these Pumpkin Pie Bars, or they’ll lose that creamy texture.
Step 5: Cool and Chill
Let the bars cool to room temperature, then stick ‘em in the fridge for at least 2 hours to fully set. I usually leave mine overnight because, honestly, they taste even better the next day. Cutting into cold Pumpkin Pie Bars is so much easier too.
Step 6: Slice and Serve
Use the parchment overhang to lift the bars out, then slice into squares with a sharp knife. I’ve got a habit of wiping the knife between cuts to keep things neat. Serve your Pumpkin Pie Bars chilled or at room temp—both ways are divine!
Nutritional Information
I’m no dietitian, but I think it’s handy to know what’s in these Pumpkin Pie Bars, especially if you’re keeping an eye on calories or macros. Here’s the rough breakdown per serving, based on cutting them into 12 pieces. Keep in mind, this is approximate since portion sizes (and sneaky extra nibbles) can vary.
- Calories: 250 per bar
- Fat: 14g
- Protein: 3g
- Carbohydrates: 28g
- Sodium: 180mg
These aren’t exactly health food, but for a treat like Pumpkin Pie Bars, I say it’s worth every bite. If you’re looking to lighten them up, I’ve got some ideas coming right up.
Healthier Alternatives
If you’re like me and sometimes wanna enjoy Pumpkin Pie Bars without the full-on guilt trip, I’ve tried a few swaps that still keep the flavor on point. Baking doesn’t have to be all or nothing, and these tweaks have worked wonders in my kitchen. Here are some healthier spins on Pumpkin Pie Bars to try.
- Reduced Sugar: Cut the brown sugar to 1/2 cup and add a tablespoon of maple syrup for natural sweetness.
- Lower Fat: Swap half the heavy cream for Greek yogurt—it adds tang and cuts calories.
- Whole Wheat Crust: Use whole wheat graham crackers for the base to sneak in some fiber.
- Egg Substitute: Replace one egg with 1/4 cup of applesauce for a lighter filling in your Pumpkin Pie Bars.
I’ve made these changes on days when I’m watching my intake, and honestly, they’re still delicious. Give ‘em a shot and see what you think!
Serving Suggestions
I love getting creative with how I serve Pumpkin Pie Bars because a little extra flair can make them feel extra special. Whether it’s a casual snack or a holiday dessert, here are some ideas straight from my table to yours. These work wonders for elevating your Pumpkin Pie Bars experience.
- With Whipped Cream: A dollop of fresh whipped cream on top is my go-to—pure bliss!
- Paired with Coffee: Serve alongside a hot latte for the ultimate fall vibe. I do this on lazy weekends.
- Drizzled Caramel: Add a thin drizzle of caramel sauce for a fancy touch to your Pumpkin Pie Bars.
- With Ice Cream: A scoop of vanilla ice cream on a warm bar? Heaven, especially for Pumpkin Pie Bars fans.
At my last family gathering, the caramel drizzle was a game-changer. How do you like to serve yours?
Common Mistakes to Avoid
I’ve had my fair share of kitchen mishaps while perfecting Pumpkin Pie Bars, so let me save you some headaches with a few pitfalls to dodge. Trust me on this one—I’ve learned the hard way more times than I care to admit. Here’s what to watch out for when making Pumpkin Pie Bars.
- Overbaking: If the center isn’t a tad jiggly when you pull it out, it’ll be too dry. I ruined a batch like this once.
- Skipping the Chill: Cutting before they’re fully cooled leads to a gooey mess. Patience is key!
- Wrong Pan Size: Stick to an 8×8 pan, or the thickness will be off for your Pumpkin Pie Bars.
- Skimping on Spices: Don’t be shy with cinnamon and nutmeg—they make the flavor pop.
Avoid these slip-ups, and you’ll be golden. I still cringe thinking about that overbaked batch—never again!
Storing Tips
Keeping your Pumpkin Pie Bars fresh is super easy if you follow a couple of simple tricks I’ve picked up over time. I’ve found these keep well with minimal effort, which is great for making ahead. Here’s how to store Pumpkin Pie Bars properly.
- Refrigerator: Store in an airtight container for up to 5 days. They actually taste better after a day or two!
- Freezer: Freeze individual bars wrapped in plastic wrap for up to 2 months. Thaw overnight in the fridge.
- Room Temp: Only leave out for a few hours max to avoid spoilage.
I often freeze a few to pull out for surprise cravings. Works like a charm!

Frequently Asked Questions
I get a lot of questions about making Pumpkin Pie Bars, so I’ve rounded up the most common ones with answers straight from my kitchen experiments. Let’s dive in and clear up any doubts you might have about whipping up these Pumpkin Pie Bars.
Can I use fresh pumpkin instead of canned?
Absolutely! I’ve done it before, and it works great. Just roast and puree your pumpkin, making sure to drain excess water so your Pumpkin Pie Bars aren’t soggy.
Can I make these ahead of time?
Yes, and I recommend it! They taste amazing after chilling overnight. I often bake them a day before events.
Are these gluten-free?
Not as written, but swap the graham crackers for a gluten-free version, and you’re good to go. I’ve got friends who swear by this tweak.
Can I double the recipe?
Totally! Use a 9×13 pan and add a few minutes to the bake time. I’ve done this for bigger crowds.
How do I know when they’re done?
Look for a slight jiggle in the center. If it’s too firm, you’ve gone too far. Trust your gut (and your timer)!
Can I skip the crust?
Sure, but it won’t be the same. The crust adds structure to Pumpkin Pie Bars. I wouldn’t skip it personally.
What if my filling cracks?
No biggie—it’s usually from overbaking or quick cooling. Cover with whipped cream, and no one’ll notice. Been there!
Can I use a different sweetener?
Yup, honey or maple syrup can work, though the texture might shift a bit. Start with less and taste as you go.
Conclusion
Well, there you have it, folks—everything you need to whip up some killer Pumpkin Pie Bars that’ll steal the show at any fall gathering. I’m so excited for you to try this recipe and make it your own, whether you stick to the classic version or toss in some of those fun variations. If you’ve got questions or wanna share how your Pumpkin Pie Bars turned out, drop me a comment—I’d love to hear about it!
Conclusion
I hope you enjoyed this recipe for Pumpkin Pie Bars! It’s truly one of my favorites, and I’m confident you’ll love it too.
Remember to follow the steps carefully for the best results. Don’t hesitate to experiment with your own variations and make this recipe your own. Happy cooking!