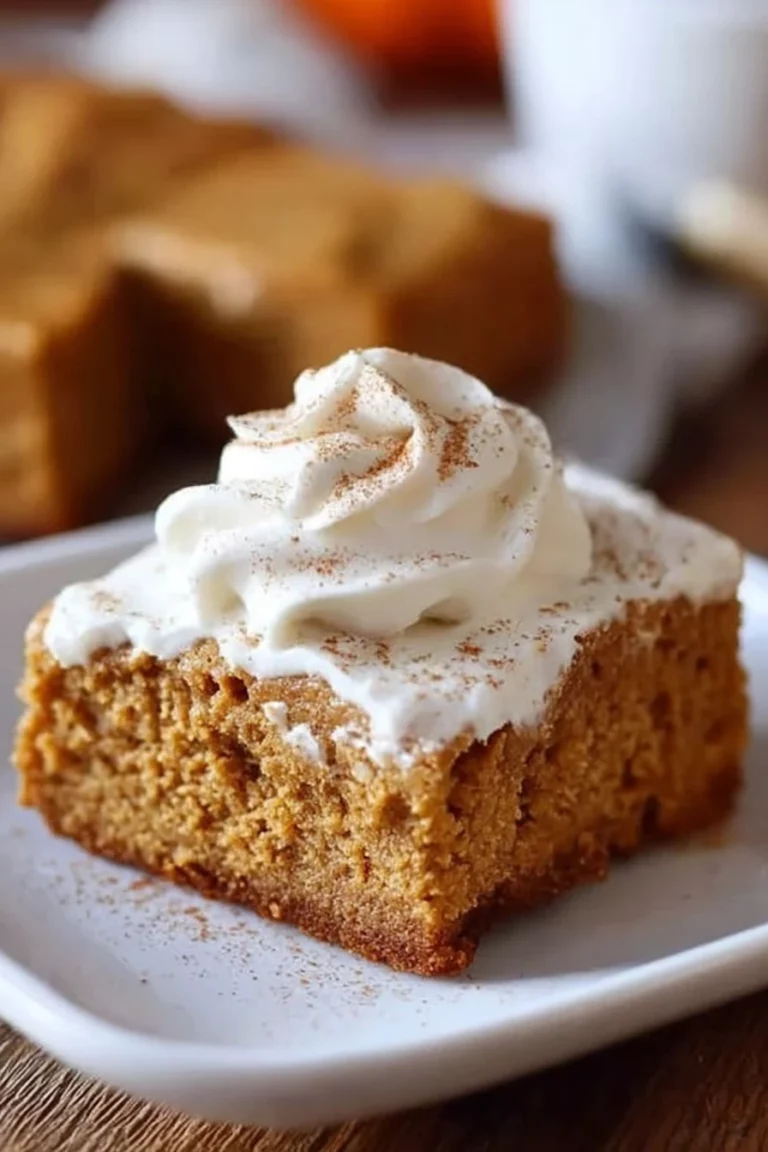
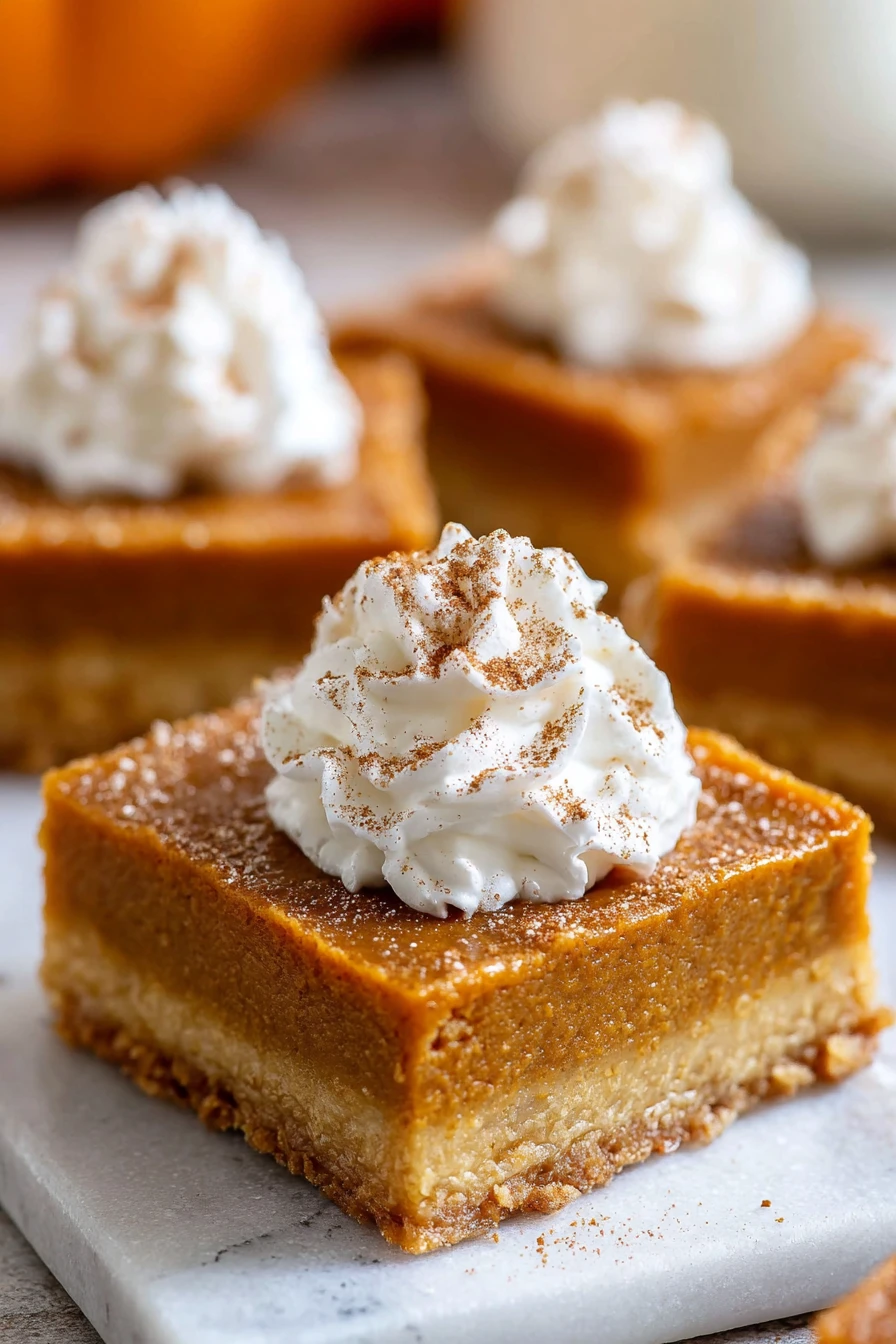
Pumpkin Pie Bars
Hey there, friends! I’ve gotta share something that’s become a total fall obsession in my house: Pumpkin Pie Bars. These little squares of heaven are like the lovechild of a classic pumpkin pie and a cozy cookie bar, and I’m not exaggerating when I say they’ve saved my sanity during busy holiday seasons.
I first stumbled on the idea of Pumpkin Pie Bars years ago when I botched a traditional pie crust (yep, total disaster), and my family still raves about that “happy accident” every Thanksgiving.
You see, I’m no stranger to kitchen flops, but figuring out Pumpkin Pie Bars turned into one of my proudest moments. They’re easier than rolling out a pie dough, yet they deliver that same creamy, spiced pumpkin goodness we all crave. So, let’s dive into why these bars are about to become your go-to dessert!
Why You’ll Love This Recipe
I’ve found that Pumpkin Pie Bars are the ultimate crowd-pleaser, whether I’m baking for my picky kids or a big family gathering. They’ve got that nostalgic fall flavor packed into every bite, but without the fuss of a pie crust that might crack or sog under pressure. Honestly, in my kitchen, that’s a game-changer.
Plus, these Pumpkin Pie Bars are super versatile (more on that later), and they’re a cinch to whip up when you’re short on time. I’m talking minimal prep for maximum “wow” factor. Trust me, you’ll be hooked once you see how easy it is to slice and serve these beauties!
Ingredients List
Alright, let’s talk ingredients for these Pumpkin Pie Bars. I’m pretty picky about using quality stuff here because, in my experience, it makes a difference in that final creamy texture. I usually buy pure pumpkin puree (not pie filling!) and stock up on spices during the fall sales.
Here’s exactly what you’ll need, split into two parts for clarity. Measurements are precise because I’ve tweaked this recipe over countless batches!
For the Crust
- 1 1/2 cups (180g) graham cracker crumbs, finely ground for a sturdy base
- 1/3 cup (67g) granulated sugar, to sweeten things up a touch
- 1/2 cup (115g) unsalted butter, melted, for that buttery richness
- 1/4 teaspoon ground cinnamon, because it pairs so well with Pumpkin Pie Bars
For the Filling
- 1 can (15 oz or 425g) pure pumpkin puree, not the pre-spiced stuff
- 2 large eggs, at room temperature for smooth mixing
- 3/4 cup (150g) brown sugar, packed, for a caramel-y depth
- 1 teaspoon ground cinnamon, for that classic warmth
- 1/2 teaspoon ground nutmeg, just a pinch for spice
- 1/4 teaspoon ground ginger, to round out the flavors
- 1/8 teaspoon ground cloves, don’t skip this tiny but mighty addition
- 1 cup (240ml) heavy cream, for ultimate creaminess in your Pumpkin Pie Bars
Variations
One thing I adore about Pumpkin Pie Bars is how easy they are to switch up depending on my mood or what’s in the pantry. I’ve played around with tons of twists over the years, and I’m excited to share some of my faves. Whether you’re catering to dietary needs or just wanna get creative, there’s a version of Pumpkin Pie Bars for everyone.
Here are some variations I’ve tried and loved (or learned from):
- Chocolate Swirl: Drizzle melted dark chocolate over the top before baking for a decadent touch. I tried this once for a friend’s birthday, and it was a hit!
- Nutty Crunch: Sprinkle chopped pecans or walnuts on top of the filling for extra texture. My kids always ask for this one.
- Gluten-Free Option: Swap the graham crackers for gluten-free crumbs. I’ve done this for a family member with celiac, and it worked like a charm.
- Vegan Vibes: Use coconut milk instead of cream and a flax egg substitute. It’s not my usual go-to, but I was surprised how yummy it turned out.
- Maple Magic: Replace half the brown sugar with pure maple syrup for a cozy twist. This one’s a personal fave for fall brunches.
- Spice It Up: Add a pinch of cardamom to the filling for an unexpected warmth. I stumbled on this combo by accident, and now it’s a regular in my Pumpkin Pie Bars lineup.
- Cream Cheese Layer: Swirl in a layer of sweetened cream cheese before baking. It’s a bit indulgent, but oh-so-worth it for special occasions.
I think you’ll have fun experimenting with these tweaks to make your Pumpkin Pie Bars truly your own!
Servings and Timing
Let’s break down the nitty-gritty of how long it takes to whip up these Pumpkin Pie Bars. In my experience, this recipe is pretty quick for a baked dessert, which is why I keep coming back to it. Here’s the timing I’ve settled on after making Pumpkin Pie Bars dozens of times:
- Prep Time: 15 minutes
- Cook Time: 45 minutes
- Total Time: 1 hour (plus cooling)
- Servings: 12-16 bars, depending on how big you slice ‘em
Step-by-Step Instructions
Alright, let’s get into the “how-to” of making Pumpkin Pie Bars. I’m gonna walk you through this like I’m right there in the kitchen with you, sharing all my little tricks. I’ve made these so many times, I could probably do it blindfolded (okay, maybe not, but you get the idea)!

Step 1: Preheat and Prep
First things first, preheat your oven to 350°F (175°C). Line an 8×8-inch baking pan with parchment paper, leaving some overhang for easy lifting later. I’ve skipped this step before and regretted it when my Pumpkin Pie Bars stuck to the pan!
Step 2: Make the Crust
In a medium bowl, mix the graham cracker crumbs, sugar, cinnamon, and melted butter until it looks like wet sand. Press this mixture firmly into the bottom of your pan using the back of a spoon or a glass. I’ve found this gives a nice, even base for Pumpkin Pie Bars.
Step 3: Whip Up the Filling
Now, in a large bowl, whisk together the pumpkin puree, eggs, brown sugar, and all those cozy spices until smooth. Slowly add the heavy cream, mixing until everything’s fully combined. This is where the magic happens for your Pumpkin Pie Bars—don’t rush it!
Step 4: Assemble and Bake
Pour the filling over your crust, smoothing it out with a spatula. Pop it in the oven for about 45 minutes, or until the center is just set but still a tad jiggly. I always keep an eye on my Pumpkin Pie Bars around the 40-minute mark to avoid overbaking.
Step 5: Cool and Chill
Let the bars cool completely on a wire rack, then chill them in the fridge for at least 2 hours. This step is key for that perfect sliceable texture in Pumpkin Pie Bars. I’ve been impatient before, and let’s just say it wasn’t pretty.
Step 6: Slice and Serve
Once chilled, use the parchment overhang to lift the bars out, then cut into squares. I like using a sharp knife wiped clean between cuts for neat edges on my Pumpkin Pie Bars. And there you go—dessert perfection!
Nutritional Information
I’m not gonna pretend I’m a nutrition guru, but I’ve crunched the numbers on these Pumpkin Pie Bars because, well, I like to know what I’m eating. Here’s the breakdown per serving (assuming 12 bars). Keep in mind, this is for the classic recipe, not any variations of Pumpkin Pie Bars.
- Calories: 280 per bar
- Fat: 16g
- Protein: 3g
- Carbohydrates: 30g
- Sodium: 120mg
Healthier Alternatives
If you’re looking to lighten up these Pumpkin Pie Bars, I’ve got some swaps I’ve tried over the years. I’m not always in the mood for “healthy” baking, but when I’m watching my intake, these tweaks help. Here are a few ideas for healthier Pumpkin Pie Bars without sacrificing flavor.
- Lower Sugar: Cut the brown sugar to 1/2 cup and add a touch of stevia or monk fruit sweetener. I’ve done this, and it’s still delish.
- Reduced Fat: Swap half the heavy cream for evaporated skim milk. It’s not as rich, but it works for lighter Pumpkin Pie Bars.
- Whole-Grain Crust: Use whole-wheat graham crackers for the base. I’ve swapped this in for a nuttier vibe and extra fiber.
- Egg Whites: Use 4 egg whites instead of 2 whole eggs to cut cholesterol. I’ve tested this and barely noticed a difference.
Serving Suggestions
I love getting creative with how I serve Pumpkin Pie Bars because it can totally change the vibe. Whether it’s a casual snack or a fancy dessert, I’ve got ideas from my own table to yours. Here are some ways to enjoy Pumpkin Pie Bars that’ll impress anyone.
- With Whipped Cream: Dollop some freshly whipped cream on top for that classic pie feel. It’s my go-to!
- Dessert Platter: Pair your Pumpkin Pie Bars with a scoop of vanilla ice cream for extra indulgence. Did this at my last dinner party—huge hit.
- Fall Brunch: Serve alongside hot apple cider for a cozy morning treat. I’ve done this on chilly weekends.
- Drizzle Delight: Add a caramel drizzle for a sweet finishing touch. Trust me, Pumpkin Pie Bars never looked so good!
Common Mistakes to Avoid
Okay, let’s talk about some pitfalls with Pumpkin Pie Bars because, y’all, I’ve made every mistake in the book. I learned the hard way, so you don’t have to. Here are the biggies to watch out for when making Pumpkin Pie Bars.
- Overbaking: If the center isn’t a bit jiggly when you pull it out, it’s overdone. I’ve ended up with dry bars before—ugh.
- Wrong Pumpkin: Don’t use pie filling instead of puree; it’s too sweet and spiced. Made that rookie move once with Pumpkin Pie Bars.
- Skipping the Chill: Cutting before they’re fully cooled leads to a mess. I’ve been there, and it’s not cute.
- Uneven Crust: Press that base down hard, or it’ll crumble. I didn’t do this my first time with Pumpkin Pie Bars, and it was a disaster.
Storing Tips
I’ve found that Pumpkin Pie Bars keep pretty well if you store ‘em right, which is awesome for make-ahead desserts. Here’s how I handle leftovers (if there are any in my house!). These tips will keep your Pumpkin Pie Bars fresh as can be.
- Refrigerator: Store in an airtight container for up to 5 days. I’ve kept them this long with no issues.
- Freezer: Wrap individual bars in plastic wrap, then freeze in a bag for up to 2 months. Perfect for future cravings of Pumpkin Pie Bars!

Frequently Asked Questions
I get a lot of questions about Pumpkin Pie Bars, so let’s tackle some common ones. I’m happy to help with anything you’re wondering about. Here we go!
Can I make Pumpkin Pie Bars ahead of time?
Absolutely! I often bake them a day or two before an event, then store ‘em in the fridge. They actually taste better after a day as the flavors meld.
Can I use fresh pumpkin instead of canned?
You bet, but it’s more work. Roast and puree your pumpkin, ensuring it’s not too watery. I’ve done it once, and it’s great but time-consuming.
Do Pumpkin Pie Bars need to be refrigerated?
Yep, due to the custard-like filling. I always pop mine in the fridge after they’ve cooled to keep ‘em safe and firm.
Can I double the recipe?
For sure! Use a 9×13 pan and adjust baking time slightly, checking at 50 minutes. I’ve doubled Pumpkin Pie Bars for big crowds with no issues.
Why did my bars crack on top?
That’s usually from overbaking or cooling too fast. I’ve had this happen when I didn’t let them cool gradually on the counter first.
Can I make these without eggs?
Yes, try a flax egg or commercial egg replacer. I’ve tested it for a vegan friend, and it worked okay, just a bit less firm.
How do I know when they’re done?
Look for a slight jiggle in the center when you shake the pan. In my kitchen, that’s the sweet spot for perfect texture.
Can I add toppings after baking?
Totally! I love adding whipped cream or nuts right before serving for a fresh touch. Experiment and see what you like!
Conclusion
So, there you have it—my tried-and-true guide to making Pumpkin Pie Bars that’ll steal the show at any fall gathering. I hope you’re as excited to bake these as I am to share ‘em, because nothing beats that first bite of spiced, creamy goodness. Give these Pumpkin Pie Bars a whirl, and let me know how they turn out—I’d love to hear!
Conclusion
I hope you enjoyed this recipe for Pumpkin Pie Bars! It’s truly one of my favorites, and I’m confident you’ll love it too. Remember to follow the steps carefully for the best results.
Don’t hesitate to experiment with your own variations and make this recipe your own. Happy cooking!