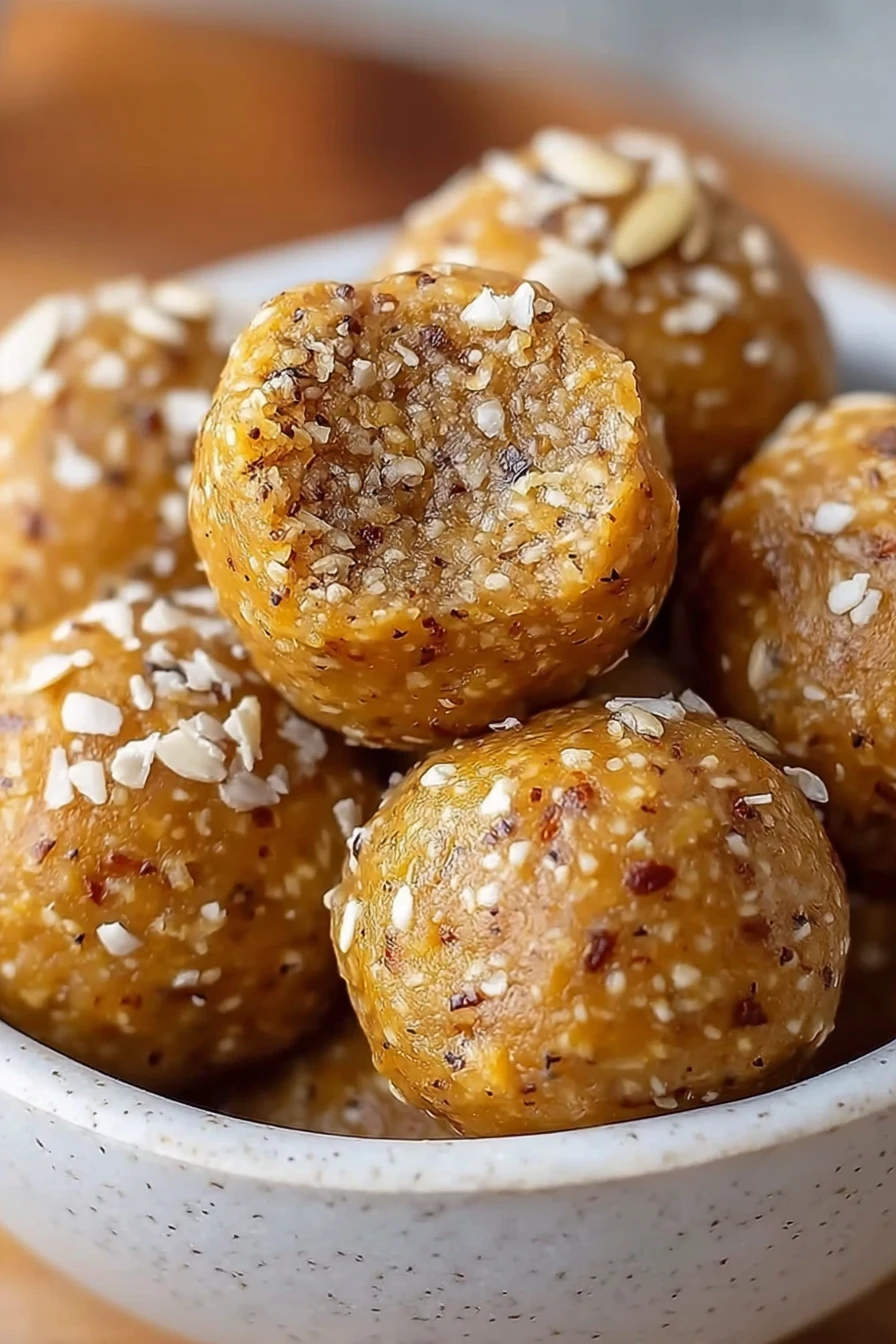
No-Bake Pumpkin Pie Energy Balls
Hey there, friends! I’ve gotta tell you about a little fall-inspired treat that’s been a game-changer in my kitchen: No-Bake Pumpkin Pie Energy Balls. I stumbled upon the idea for these No-Bake Pumpkin Pie Energy Balls a few years back when I was desperate for a quick snack that screamed autumn but didn’t require turning on the oven.
My family loves them so much that I now whip up a batch of these No-Bake Pumpkin Pie Energy Balls every October, and they disappear faster than I can roll ‘em!
It all started one chilly afternoon when I was craving pumpkin pie but just didn’t have the energy (or patience!) for a full baking session. So, I rummaged through my pantry, tossed some ingredients together, and voilà—these No-Bake Pumpkin Pie Energy Balls were born. Let me tell you, they’ve become my go-to for a quick bite or a sweet fix.
Why You’ll Love This Recipe
I’ve found that these No-Bake Pumpkin Pie Energy Balls are a total win for anyone with a busy schedule or a sweet tooth that won’t quit. They’re ridiculously easy to make—no fancy equipment or baking skills needed—and they pack all the cozy flavors of pumpkin pie into a bite-sized snack. Honestly, in my kitchen, they’re a lifesaver on hectic days!
Plus, they’re customizable (more on that later), and I love how they satisfy my dessert cravings without the guilt. Whether you’re a pumpkin fanatic like me or just looking for a wholesome treat, I’m betting you’ll be hooked on these No-Bake Pumpkin Pie Energy Balls. Trust me, one bite, and you’ll see why my kids beg for them nonstop!
Ingredients List
Let’s talk about what goes into these No-Bake Pumpkin Pie Energy Balls, shall we? I’ve tweaked this recipe over the years to get the perfect balance of flavor and texture, and I’m pretty darn happy with it. I usually buy most of these ingredients in bulk during fall because I know I’ll be making batch after batch of No-Bake Pumpkin Pie Energy Balls.
Here’s everything you’ll need to whip up your own No-Bake Pumpkin Pie Energy Balls. I prefer using organic where I can, but honestly, use whatever you’ve got on hand—these are forgiving little bites!
- 1 cup (240g) canned pumpkin puree, make sure it’s pure pumpkin, not pie filling
- 1 1/2 cups (150g) old-fashioned rolled oats, for that hearty texture
- 1/2 cup (120ml) maple syrup, I love the real stuff for depth of sweetness
- 1/4 cup (60g) almond butter, creamy works best to bind everything
- 1 teaspoon pumpkin pie spice, or mix your own with cinnamon, nutmeg, and cloves
- 1/2 teaspoon vanilla extract, for a little extra warmth
- 1/4 teaspoon salt, just a pinch to balance the sweetness
- 1/3 cup (50g) chopped pecans or walnuts, optional, but I adore the crunch
- 1/4 cup (40g) mini chocolate chips, because, well, chocolate makes everything better!
Variations
One of the things I love most about these No-Bake Pumpkin Pie Energy Balls is how easy they are to tweak based on what I’m craving or what’s in my pantry. I’ve played around with different add-ins and flavors over the years, and let me tell you, there’s no wrong way to make these babies.
Whether you’re catering to picky eaters or just feeling adventurous, these No-Bake Pumpkin Pie Energy Balls can handle it.
Here are some variations I’ve tried for No-Bake Pumpkin Pie Energy Balls, and trust me, they’ve all been hits in my house. My kids always ask for the chocolate-heavy version, while I’m partial to anything with a bit of spice. Give these a shot and let me know which one’s your fave!
- Choco-Hazelnut Twist: Swap the almond butter for hazelnut spread and bump up the chocolate chips to 1/2 cup for a decadent vibe.
- Cranberry Crunch: Mix in 1/3 cup dried cranberries for a tart pop that screams fall.
- Coconut Dream: Roll the finished No-Bake Pumpkin Pie Energy Balls in shredded coconut for a tropical twist.
- Spicy Kick: Add a pinch of cayenne or extra cinnamon for a little heat—I tried this once and was pleasantly surprised!
- Nut-Free Version: Use sunflower seed butter instead of almond butter if allergies are a concern.
- Protein Boost: Toss in a scoop of vanilla protein powder to make these a post-workout snack.
- White Chocolate Bliss: Replace regular chocolate chips with white chocolate chips for a sweeter, creamier bite.
- Seed Sensation: Add 2 tablespoons of chia or flax seeds for extra nutrition and a subtle crunch.
Servings and Timing
Now, let’s break down the nitty-gritty of making these No-Bake Pumpkin Pie Energy Balls. In my experience, this recipe comes together super quick, which is why I love it for those last-minute snack emergencies. Here’s how long it usually takes me to whip up a batch of No-Bake Pumpkin Pie Energy Balls, along with how many folks it’ll feed.
- Prep Time: 15 minutes
- Chill Time: 30 minutes in the fridge
- Total Time: About 45 minutes
- Servings: Makes 20-24 energy balls, depending on how big you roll ‘em
Step-by-Step Instructions
Alright, let’s get rolling (pun totally intended!) on these No-Bake Pumpkin Pie Energy Balls. I’m gonna walk you through each step like I’m right there in your kitchen, sharing all my little tricks and shortcuts. I’ve made these so many times, I’ve got it down to a science, so let’s do this!

Step 1: Mix the Wet Ingredients
Start by grabbing a big ol’ mixing bowl and combining the pumpkin puree, maple syrup, almond butter, vanilla extract, and a pinch of salt. I like to use a spatula to really smoosh everything together until it’s nice and smooth. Pro tip: if your almond butter’s a bit stiff, pop it in the microwave for 10 seconds to loosen it up.
Step 2: Add the Dry Stuff
Next, toss in the rolled oats and pumpkin pie spice, and stir until everything’s well combined. I’ve learned that giving it a good mix at this stage ensures your No-Bake Pumpkin Pie Energy Balls hold together later. If you’re adding nuts or chocolate chips, fold ‘em in now—don’t skimp if you’re a texture freak like me!
Step 3: Roll ‘Em Up
Here’s where it gets fun! Scoop out about a tablespoon of the mixture and roll it into a ball with your hands. I usually wet my hands a bit to keep the mix from sticking, ‘cause let’s be real, it can get messy. Keep going until you’ve got all your No-Bake Pumpkin Pie Energy Balls ready to chill.
Step 4: Chill and Set
Pop those little bites of heaven onto a baking sheet or plate and slide ‘em into the fridge for at least 30 minutes. This firms up your No-Bake Pumpkin Pie Energy Balls so they don’t fall apart when you sneak one (or three). I’ve been known to “test” one straight from the bowl, but chilling really does make a difference!
Step 5: Enjoy or Store
Once they’re set, dig into these No-Bake Pumpkin Pie Energy Balls or transfer them to an airtight container. I’ll share more storing tips later, but honestly, they rarely last long enough in my house to need much storage. And that’s it—easy as pie, right?
Nutritional Information
I’m not gonna pretend I’m a nutritionist, but I’ve crunched the numbers on these No-Bake Pumpkin Pie Energy Balls, and they’re a pretty solid snack in my book. They’ve got a nice balance of carbs, fats, and protein to keep you going. Here’s the breakdown per serving for these No-Bake Pumpkin Pie Energy Balls (based on 24 balls).
- Calories: 90 per ball
- Fat: 4g
- Protein: 2g
- Carbohydrates: 12g
- Sodium: 25mg
Healthier Alternatives
If you’re looking to lighten up these No-Bake Pumpkin Pie Energy Balls, I’ve got a few swaps that I’ve tried and loved. When I’m watching my sugar intake, I play around with the sweeteners and fats, and honestly, they still taste amazing. Here are some ideas to make your No-Bake Pumpkin Pie Energy Balls a bit guilt-free without sacrificing flavor. Give ‘em a whirl!
- Sugar Substitute: Use honey instead of maple syrup for a slightly lower glycemic index.
- Lower Fat: Swap half the almond butter for mashed banana—works like a charm.
- Gluten-Free: Use certified gluten-free oats if you’ve got sensitivities.
- Less Chocolate: Cut back on chocolate chips or skip ‘em entirely for fewer calories in your No-Bake Pumpkin Pie Energy Balls.
Serving Suggestions
I’ve got some fun ideas for enjoying these No-Bake Pumpkin Pie Energy Balls, straight from my own table. I love serving them in different ways depending on the vibe—whether it’s a quick snack or a little dessert moment. Here are my go-to serving suggestions for No-Bake Pumpkin Pie Energy Balls that might spark some inspiration for you!
- Morning Fuel: Pair with a cup of coffee for a cozy fall breakfast on the go.
- After-School Snack: Serve with apple slices for a kid-friendly treat.
- Dessert Bite: Dust with a sprinkle of cinnamon for an extra festive touch.
- Party Platter: Arrange your No-Bake Pumpkin Pie Energy Balls on a tray with other fall treats at gatherings.
Common Mistakes to Avoid
Look, I’ve flubbed my fair share of recipes, and these No-Bake Pumpkin Pie Energy Balls are no exception. I’ve learned the hard way what can go wrong if you’re not careful, so let me save you the hassle. Here are some common slip-ups to dodge when making No-Bake Pumpkin Pie Energy Balls, straight from my own kitchen blunders!
- Too Much Liquid: Don’t overdo the pumpkin puree, or they’ll be mushy—trust me on this one, I’ve had soggy batches.
- Not Chilling Enough: Skipping the fridge time makes them fall apart; give ‘em at least 30 minutes.
- Wrong Oats: Quick oats can make them too soft—stick with rolled oats for structure.
- Over-Rolling: Don’t pack ‘em too tight, or your No-Bake Pumpkin Pie Energy Balls will be dense as bricks!
Storing Tips
I’ve found that these No-Bake Pumpkin Pie Energy Balls keep pretty well if you store ‘em right, which is great for meal prep or hiding a stash from hungry family members (guilty!). In my experience, a little planning goes a long way. Here’s how I keep my No-Bake Pumpkin Pie Energy Balls fresh!
- Refrigerator: Store in an airtight container for up to a week.
- Freezer: Freeze for up to 2 months in a zip-top bag; thaw overnight in the fridge.
- Room Temp: Good for a day or two if you’re taking ‘em on the go.

Frequently Asked Questions
I’ve gotten a bunch of questions over the years about these No-Bake Pumpkin Pie Energy Balls, so I figured I’d round up the most common ones. Here’s the scoop on everything you might be wondering about No-Bake Pumpkin Pie Energy Balls. Let’s dive in!
Can I make these ahead of time?
Absolutely, and I often do! These No-Bake Pumpkin Pie Energy Balls last a week in the fridge, so they’re perfect for prepping on a lazy Sunday.
Are they kid-friendly?
Yup, my kiddos can’t get enough. Just watch the nuts if there are allergies in the mix.
Can I use fresh pumpkin?
Sure can, but cook and puree it first. I find canned pumpkin easier, though!
Do they need to be refrigerated?
Yes, chilling helps ‘em hold shape. I’d keep ‘em in the fridge for the best texture.
Can I skip the sweetener?
You could, but they might be bland. Try a mashed banana for natural sweetness.
What if they’re too sticky?
Add more oats, a tablespoon at a time. That usually fixes it in my kitchen.
Are these vegan?
They are if you use maple syrup instead of honey. Double-check your chocolate chips too!
How do I make them less soft?
Chill ‘em longer or add extra oats. I’ve had to do this a few times myself with No-Bake Pumpkin Pie Energy Balls.
Conclusion
So there you have it, folks—my tried-and-true recipe for No-Bake Pumpkin Pie Energy Balls that I swear by every fall. I hope you’ll give these little bites a try and fall in love with ‘em just like my family has. If you’ve got questions or fun twists on No-Bake Pumpkin Pie Energy Balls, drop ‘em below—I’d love to hear!
Conclusion
I hope you enjoyed this recipe for No-Bake Pumpkin Pie Energy Balls! It’s truly one of my favorites, and I’m confident you’ll love it too.
Remember to follow the steps carefully for the best results. Don’t hesitate to experiment with your own variations and make this recipe your own. Happy cooking!