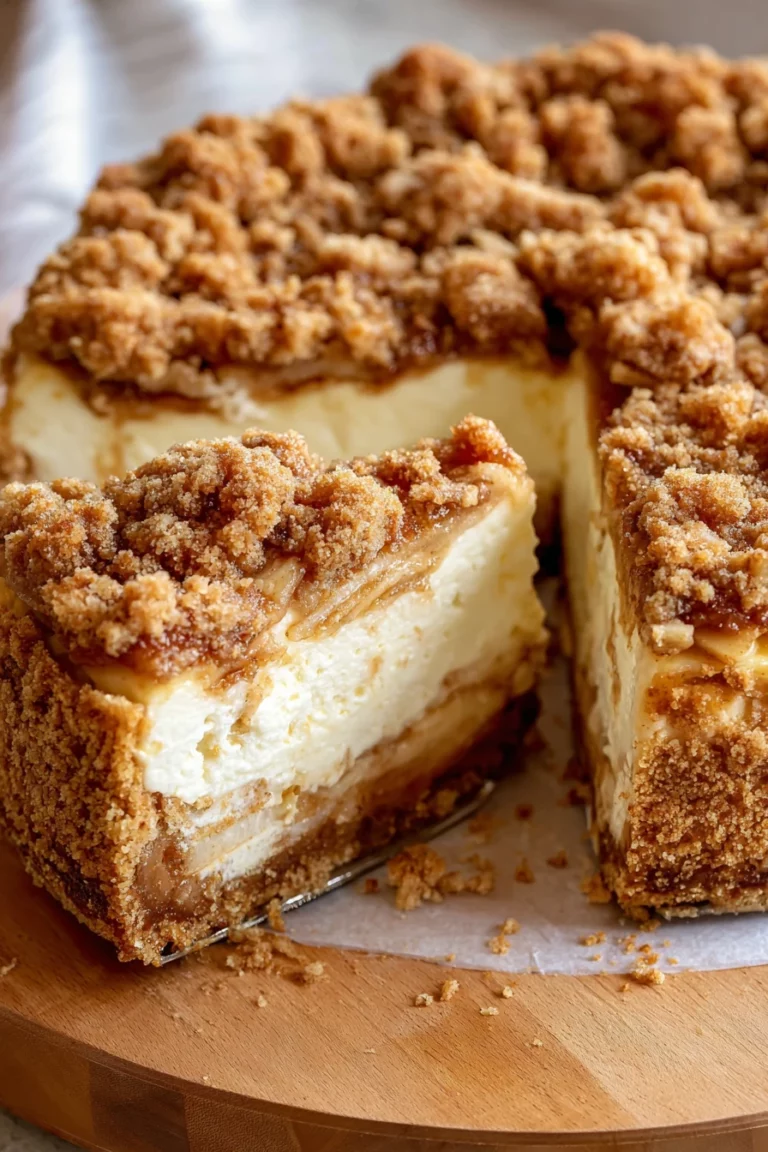
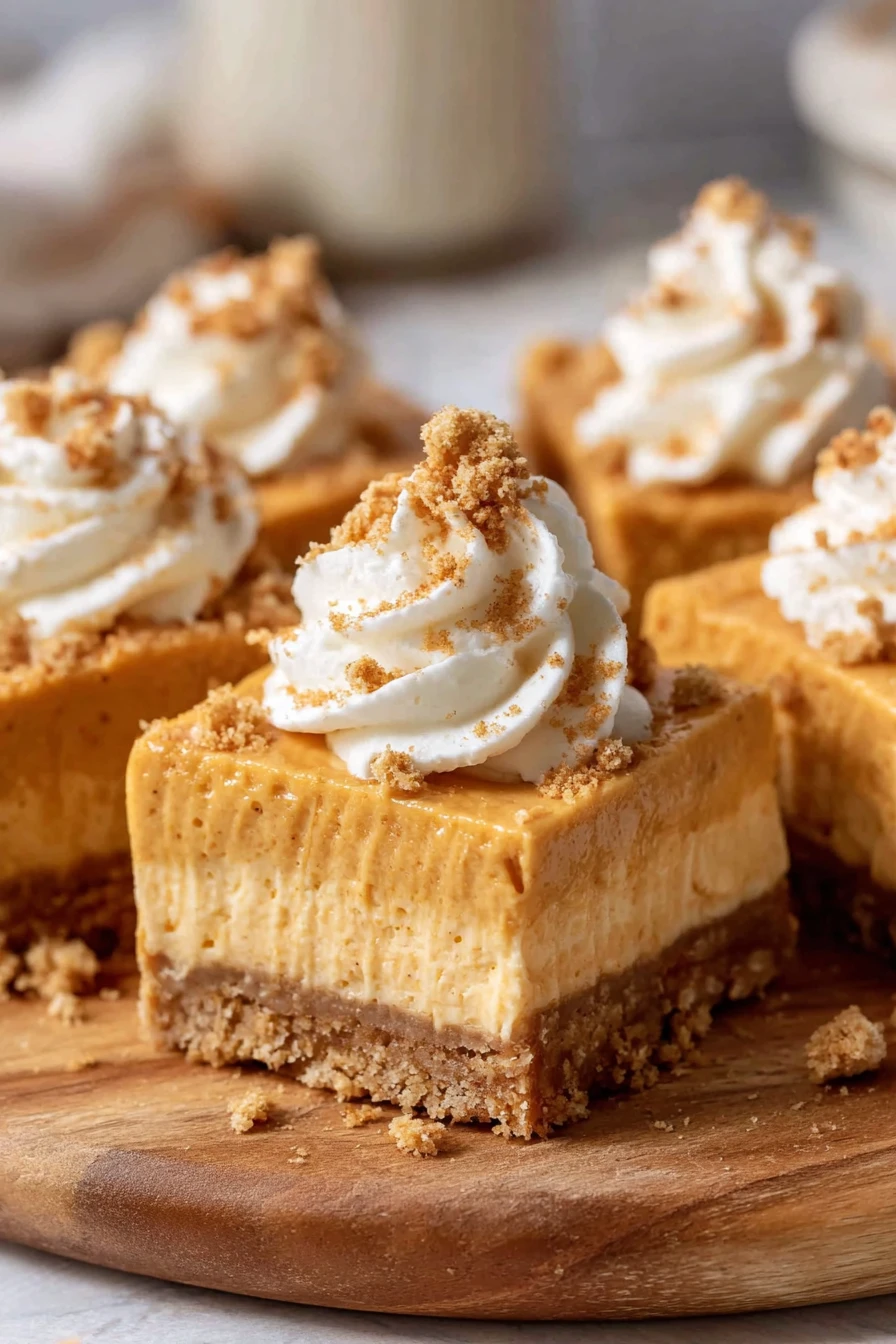
No Bake Pumpkin Cheesecake Bars
Hey there, fellow food lovers! I’ve got a treat for you today that’s gonna knock your socks off, especially if you’re craving fall flavors without the hassle of baking. I’m talking about No Bake Pumpkin Cheesecake Bars, a dessert so easy and delicious that I’ve made it a staple in my kitchen every autumn. A few years back, I discovered these No Bake Pumpkin Cheesecake Bars while scrambling for a last-minute Thanksgiving dessert, and let me tell you, they saved the day!
My family went nuts over the creamy pumpkin filling and the buttery graham cracker crust. I still remember my youngest sneaking seconds before dinner was even over (true story!). So, if you’re looking for a crowd-pleaser like these No Bake Pumpkin Cheesecake Bars, stick with me. I’m spilling all my tips and tricks to make them just right.
And honestly, who doesn’t love a recipe that doesn’t require turning on the oven? These No Bake Pumpkin Cheesecake Bars are perfect for when you’re short on time but still want something homemade and festive. Let’s dive in!
Why You’ll Love This Recipe
I’ve found that No Bake Pumpkin Cheesecake Bars are a game-changer for so many reasons. First off, they’re ridiculously simple to whip up, even if you’re not a pro in the kitchen. In my experience, you can have these ready to chill in under 30 minutes, which is a lifesaver during holiday chaos.
Plus, the flavor? Oh my gosh, it’s like autumn in every bite with that spiced pumpkin goodness! I’ve made these No Bake Pumpkin Cheesecake Bars for potlucks, family gatherings, and even just a random Tuesday night, and they never fail to impress. Trust me, once you try them, you’ll be hooked too.
Ingredients List
Alright, let’s get down to the nitty-gritty of what you’ll need for these No Bake Pumpkin Cheesecake Bars. I’m super particular about my ingredients because I’ve learned that quality makes a huge difference in desserts like this. So, here’s my go-to list with a few personal notes on what I prefer to use.
For the Crust
- 2 cups (240g) graham cracker crumbs, finely crushed for that perfect base
- 1/2 cup (115g) unsalted butter, melted, because I love the rich flavor it adds
- 1/4 cup (50g) granulated sugar, just enough to sweeten the deal
For the Filling
- 16 oz (450g) cream cheese, softened to room temperature (I usually buy full-fat for extra creaminess)
- 1 cup (240g) canned pumpkin puree, not pumpkin pie filling—trust me on this!
- 3/4 cup (150g) granulated sugar, for that sweet balance
- 1 teaspoon pumpkin pie spice, or a mix of cinnamon and nutmeg if you’re feeling fancy
- 1 teaspoon vanilla extract, for a little depth
- 1 cup (240ml) heavy cream, whipped to stiff peaks (I prefer whipping my own over using store-bought)
These ingredients come together to create No Bake Pumpkin Cheesecake Bars that are pure magic. I’ve played around with different brands over the years, and I usually grab Philadelphia cream cheese because it’s consistently smooth. And don’t skimp on the pumpkin puree—make sure it’s 100% pumpkin for the best texture in your No Bake Pumpkin Cheesecake Bars. You’ve got this!
Variations
One of the things I adore about No Bake Pumpkin Cheesecake Bars is how versatile they are. I’ve experimented with all sorts of twists depending on my mood or what I’ve got in the pantry, and they always turn out delish. Here are some of my fave variations for these No Bake Pumpkin Cheesecake Bars to keep things fresh.
- Chocolate Drizzle: Melt some dark chocolate and drizzle it over the top once they’re set for a decadent touch.
- Ginger Snap Crust: Swap graham crackers for crushed ginger snaps to amp up that spicy fall vibe.
- Maple Twist: Add 2 tablespoons of maple syrup to the filling for a cozy, sweet note.
- Caramel Swirl: Swirl in some store-bought caramel sauce before chilling—my kids go wild for this one!
- Nutty Crunch: Sprinkle chopped pecans or walnuts on top for a bit of texture.
- Cinnamon Boost: Double the pumpkin pie spice or add extra cinnamon if you’re a spice lover like me.
- White Chocolate Chips: Fold in a handful of white chocolate chips for little bursts of sweetness.
- Coconut Flair: Mix shredded coconut into the crust for a tropical twist—I tried this once and was pleasantly surprised!
I’ve gotta say, the ginger snap crust version of these No Bake Pumpkin Cheesecake Bars is probably my personal favorite for holiday parties. My family always begs for the caramel swirl, though, so I mix it up depending on who’s coming over. Which one are you gonna try first?
Servings and Timing
Let’s talk logistics for these No Bake Pumpkin Cheesecake Bars because I know timing is everything when you’re planning a meal. In my experience, this recipe comes together pretty quickly, but you’ll need to account for chilling time. Here’s the breakdown based on how long it usually takes me to make these No Bake Pumpkin Cheesecake Bars.
- Prep Time: 20 minutes
- Chill Time: 4 hours (or overnight if you’ve got the patience)
- Total Time: About 4 hours and 20 minutes
- Servings: 12-16 bars, depending on how generous you’re feeling
Step-by-Step Instructions
Now, let’s roll up our sleeves and get into making these No Bake Pumpkin Cheesecake Bars. I’ve made this recipe dozens of times, so I’m sharing all my little hacks to make it as smooth as possible. Follow along, and don’t hesitate to reach out if you’ve got questions!

Step 1: Make the Crust
Start by mixing your graham cracker crumbs, melted butter, and sugar in a bowl until it looks like wet sand. I like to use a food processor to get those crumbs super fine—it’s a game-changer for texture. Press this mixture firmly into the bottom of an 8×8-inch pan lined with parchment paper, and pop it in the fridge while you work on the filling for your No Bake Pumpkin Cheesecake Bars.
Step 2: Prepare the Pumpkin Filling
In a large bowl, beat the softened cream cheese with a hand mixer until it’s nice and fluffy. Add in the pumpkin puree, sugar, pumpkin pie spice, and vanilla extract, mixing until everything’s combined. I’ve found that room-temp cream cheese is key here, or you’ll end up with annoying lumps in your No Bake Pumpkin Cheesecake Bars.
Step 3: Fold in the Whipped Cream
Whip your heavy cream in a separate bowl until stiff peaks form—I usually do this by hand for a mini workout! Gently fold it into the pumpkin mixture to keep things light and airy. This step really makes these No Bake Pumpkin Cheesecake Bars melt in your mouth.
Step 4: Assemble and Chill
Spread the filling evenly over your chilled crust, smoothing the top with a spatula. Cover the pan and let it chill in the fridge for at least 4 hours, though overnight is even better if you’ve got the time. I’ve rushed this before, and trust me, patience pays off with these No Bake Pumpkin Cheesecake Bars.
Step 5: Slice and Serve
Once set, lift the bars out using the parchment paper and cut into squares. I like using a sharp knife dipped in hot water for clean cuts—it’s a little trick I picked up over the years. Enjoy your No Bake Pumpkin Cheesecake Bars with a big ol’ smile!
Nutritional Information
I’m no nutritionist, but I’ve crunched the numbers for these No Bake Pumpkin Cheesecake Bars because I know some of y’all like to keep track. Here’s the approximate breakdown per serving, based on cutting them into 12 pieces. Keep in mind, these are a treat, so don’t stress too much over the stats when enjoying your No Bake Pumpkin Cheesecake Bars!
- Calories: 320 per bar
- Fat: 22g
- Protein: 4g
- Carbohydrates: 28g
- Sodium: 180mg
Healthier Alternatives
If you’re looking to lighten up these No Bake Pumpkin Cheesecake Bars, I’ve got you covered with some swaps I’ve tried myself. I’m all about balance, so when I’m watching my calories, I tweak the recipe a bit. Here are my go-to healthier options for No Bake Pumpkin Cheesecake Bars without sacrificing that yummy taste.
- Low-Fat Cream Cheese: Swap in reduced-fat cream cheese to cut down on fat content.
- Sugar Substitute: Use a natural sweetener like stevia or monk fruit in place of granulated sugar.
- Light Whipped Topping: Replace heavy cream with a store-bought light whipped topping for fewer calories.
- Whole Wheat Crust: Try whole wheat graham crackers for the base to add a bit of fiber.
I’ve swapped in low-fat cream cheese for No Bake Pumpkin Cheesecake Bars before, and honestly, they’re still pretty darn good. Just don’t expect the exact same richness, okay?
Serving Suggestions
I love getting creative with how I serve these No Bake Pumpkin Cheesecake Bars, especially when I’ve got guests over. They’re so versatile, and a little extra flair can make them feel extra special. Here are some ideas I’ve tried for serving up No Bake Pumpkin Cheesecake Bars that always get compliments.
- With Whipped Cream: Add a dollop of whipped cream on top for a classic touch.
- Dusted with Spice: Sprinkle a pinch of cinnamon or nutmeg over each bar for a festive look.
- Paired with Coffee: Serve alongside a hot cup of spiced latte for the ultimate fall treat.
- At Parties: Cut into bite-sized pieces for easy grab-and-go snacking at gatherings.
At my last fall get-together, I served these No Bake Pumpkin Cheesecake Bars with whipped cream, and folks couldn’t stop raving. How do you plan to enjoy yours?
Common Mistakes to Avoid
I’ve had my fair share of kitchen blunders with No Bake Pumpkin Cheesecake Bars, so I’m passing on the lessons I’ve learned the hard way. These pitfalls are easy to dodge if you know what to watch for. Save yourself the headache with these tips for perfect No Bake Pumpkin Cheesecake Bars every time.
- Not Chilling Long Enough: I rushed this once, and the bars were a mushy mess—give them at least 4 hours!
- Using Cold Cream Cheese: Cold cheese equals lumps, and trust me, it’s a pain to fix.
- Wrong Pumpkin: Pumpkin pie filling instead of puree will mess up the texture—been there, done that.
- Loose Crust: Press that crust down hard, or it’ll crumble when you cut your No Bake Pumpkin Cheesecake Bars.
Storing Tips
I’ve found that these No Bake Pumpkin Cheesecake Bars keep pretty well if you store them right, which is awesome for making ahead. In my experience, a little planning goes a long way. Here’s how I store my No Bake Pumpkin Cheesecake Bars to keep them fresh.
- Refrigerator: Store in an airtight container for up to 5 days.
- Freezer: Freeze individual bars wrapped in plastic wrap for up to 2 months.
- Serving Later: Let frozen bars thaw in the fridge overnight before eating.

Frequently Asked Questions
I get a ton of questions about No Bake Pumpkin Cheesecake Bars, so I’ve rounded up the most common ones I hear. Let’s tackle these together so you can whip up these treats with confidence. Here we go!
Can I make No Bake Pumpkin Cheesecake Bars ahead of time?
Absolutely! I often prep them a day or two in advance, and they hold up beautifully in the fridge. Just keep them covered so they don’t pick up any funky fridge smells.
Can I use fresh pumpkin instead of canned?
You can, but it’s a bit of extra work. Make sure to cook and puree it really smooth, and drain any excess liquid. I stick to canned for convenience, honestly.
Do these bars freeze well?
Yep, they freeze like a dream! Wrap each bar tightly in plastic wrap, then pop them in a freezer bag. Thaw in the fridge when you’re ready.
Can I use a different crust?
For sure! I’ve used Oreos or ginger snaps before, and both work great. Just keep the butter ratio the same for binding.
What if my filling isn’t setting?
Hmm, that’s usually due to not enough chilling time or under-whipped cream. Give it a few more hours in the fridge. If it’s still soft, you might need to whip that cream stiffer next time.
Can I make these gluten-free?
Yes, just use gluten-free graham crackers for the crust. I’ve done this for a friend, and it turned out awesome. Check your other ingredients for sneaky gluten too.
How do I cut clean slices?
My trick is a hot knife! Dip your knife in hot water, wipe it dry, and slice. Works like a charm every time for No Bake Pumpkin Cheesecake Bars.
Can I double the recipe?
Totally! Use a 9×13 pan instead, and double all the ingredients. It’s perfect for bigger crowds, and I’ve done it tons of times for parties.
Conclusion
Well, friends, I hope you’re as excited as I am to try these No Bake Pumpkin Cheesecake Bars! They’ve been a lifesaver in my kitchen, bringing smiles to every table I’ve set them on. So, grab your ingredients, carve out a little time, and treat yourself to some No Bake Pumpkin Cheesecake Bars—you won’t regret it. Drop a comment if you make them; I’d love to hear how they turn out!
Conclusion
I hope you enjoyed this recipe for No Bake Pumpkin Cheesecake Bars! It’s truly one of my favorites, and I’m confident you’ll love it too.
Remember to follow the steps carefully for the best results. Don’t hesitate to experiment with your own variations and make this recipe your own. Happy cooking!