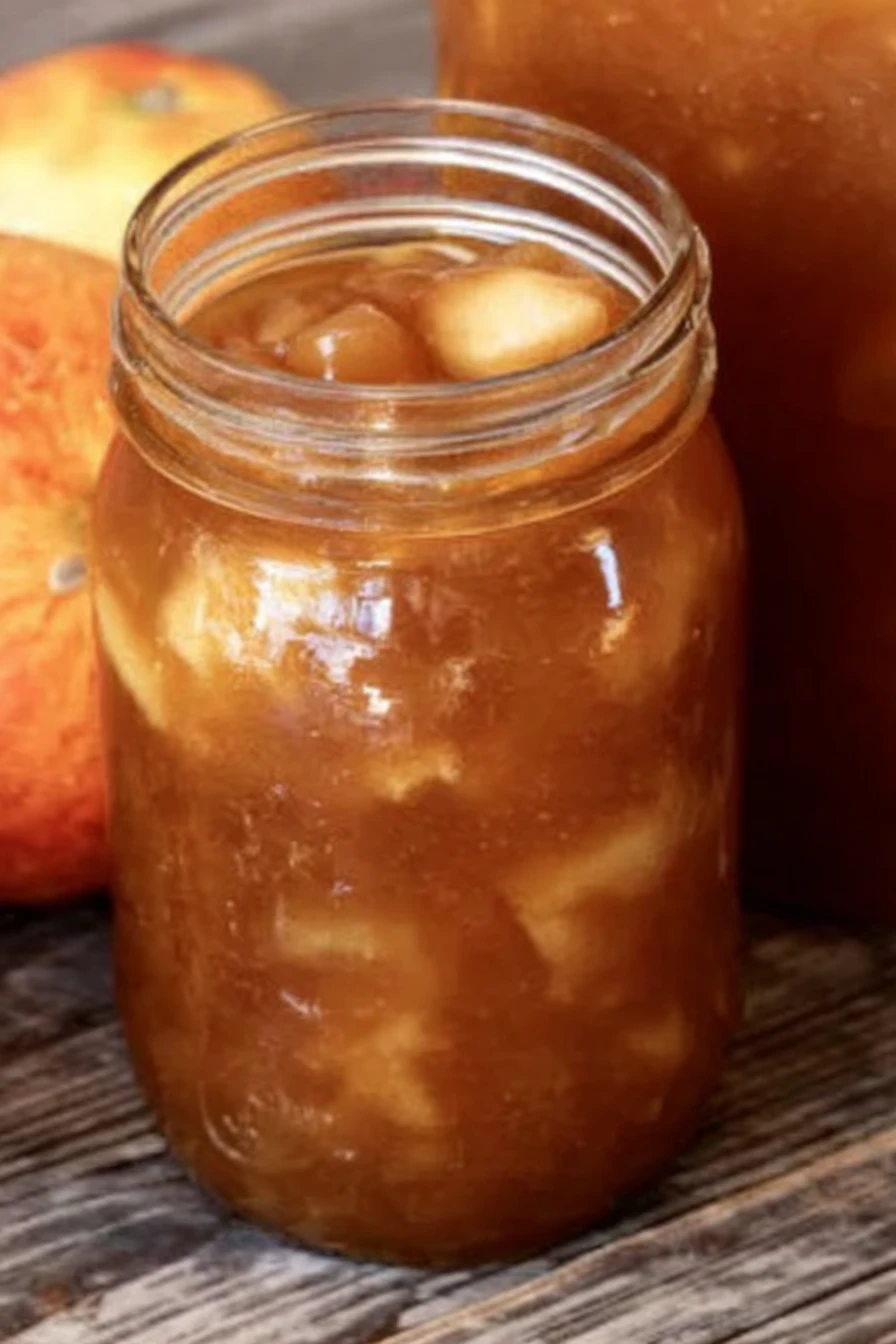
Homemade Apple Pie Filling
I’ll never forget the first time I tried making Homemade Apple Pie Filling from scratch. It was a crisp fall day, and I’d just come back from apple picking with my family, arms loaded with Honeycrisps and Granny Smiths.
I figured, how hard could it be to whip up some Homemade Apple Pie Filling for a pie that night? Well, let’s just say I underestimated the art of getting that perfect balance of sweet, tart, and gooey goodness—but I’ve since perfected it, and now it’s a staple in my kitchen for pies, crumbles, or even just spooning over ice cream!
Fast forward a few years, and my Homemade Apple Pie Filling recipe has become a bit of a legend among my friends and family. I’m not kidding when I say my kids beg for it every autumn, and my husband claims it’s better than his grandma’s (don’t tell her!). I’m so excited to share this with you, because if I can go from a sticky, overly sweet mess to nailing Homemade Apple Pie Filling, I know you can too.
Why You’ll Love This Recipe
In my kitchen, I’ve found that making Homemade Apple Pie Filling is a total game-changer compared to the canned stuff. It’s not just about the taste—though the fresh apple flavor mixed with warm spices like cinnamon is unbeatable—but also about how easy it is to customize. You control the sweetness, the texture, everything!
Plus, there’s something so satisfying about the process, ya know? I love how my house smells like a cozy bakery while it simmers on the stove. Trust me, once you try this Homemade Apple Pie Filling, you’ll never go back to store-bought again.
Ingredients List
When it comes to making Homemade Apple Pie Filling, the ingredients are pretty straightforward, but I’ve got my preferences after years of tweaking. I usually buy firm, tart apples like Granny Smith because they hold their shape and balance the sweetness. But honestly, mixing varieties can add depth to your Homemade Apple Pie Filling, so don’t be afraid to experiment. Here’s exactly what you’ll need to get started.
For the Filling
- 6 medium apples (about 2.5 lbs), peeled, cored, and sliced into 1/4-inch pieces—I prefer a mix of Granny Smith and Honeycrisp for that sweet-tart vibe
- 3/4 cup (150g) granulated sugar, adjust based on apple sweetness
- 1/4 cup (50g) brown sugar, packed, for a deeper, caramel-like note
- 2 tablespoons (30ml) lemon juice, freshly squeezed to brighten the flavors
- 1 teaspoon ground cinnamon, for that classic warm spice
- 1/4 teaspoon ground nutmeg, just a pinch for extra coziness
- 2 tablespoons (16g) cornstarch, to thicken the juices into a luscious syrup
- 1 cup (240ml) water, to help simmer and meld the flavors
- 1 teaspoon vanilla extract, added at the end for a subtle richness
I swear by fresh lemon juice over the bottled kind for Homemade Apple Pie Filling—it just pops! And don’t skimp on peeling the apples; I tried leaving the skins on once, and the texture was all wrong.
Variations
One of the things I adore about Homemade Apple Pie Filling is how versatile it is. You can tweak it to suit your mood or whatever’s in your pantry. Over the years, I’ve played around with different twists on this recipe, and my family’s always game to be my taste testers. Here are some variations for Homemade Apple Pie Filling that I’ve tried and loved.
- Spiced-Up Kick: Toss in 1/4 teaspoon of ground cloves or allspice for an extra punch of warmth. I did this once for a holiday party, and folks couldn’t stop raving.
- Boozy Twist: Add 2 tablespoons of bourbon or apple cider vinegar near the end of cooking for a grown-up flavor. It’s my go-to for fancy dinners.
- Maple Magic: Swap half the granulated sugar for maple syrup. My kids always ask for this version with pancakes!
- Cranberry Crunch: Mix in 1/2 cup of dried cranberries for a tart, chewy bite. It’s a holiday fave in my house.
- Nutty Addition: Stir in 1/3 cup chopped walnuts or pecans after cooking. I tried this once on a whim, and it added such a nice crunch to my Homemade Apple Pie Filling.
- Caramel Dream: Drizzle in 1/4 cup of caramel sauce for a decadent touch. Be warned, it’s addictive!
- Orange Zest Zing: Add 1 teaspoon of orange zest with the lemon juice for a citrusy lift. I love how it brightens everything up.
- Extra Gooey: Increase the cornstarch by 1/2 tablespoon if you want a thicker Homemade Apple Pie Filling for pies that hold together better.
Servings and Timing
In my experience, timing for making Homemade Apple Pie Filling depends a bit on how fast you peel and slice those apples (I’m still not a pro with a peeler!). But once you’ve got everything prepped, it comes together pretty quickly. Here’s the breakdown for this batch of Homemade Apple Pie Filling.
- Prep Time: 20 minutes
- Cook Time: 15 minutes
- Total Time: 35 minutes
- Servings: Enough for one 9-inch pie or about 4-5 cups of filling
Step-by-Step Instructions
Let me walk you through how I make Homemade Apple Pie Filling, step by step. I’ve done this enough times to have a few tricks up my sleeve, so I’ll share those too. It’s easier than it looks, I promise!

Step 1: Prep the Apples
First things first, peel, core, and slice your apples into even 1/4-inch pieces. I like using an apple corer to save time, but a good ol’ knife works just as well. Toss the slices with lemon juice right away to keep ‘em from browning while you work.
Step 2: Mix the Dry Stuff
In a small bowl, whisk together the granulated sugar, brown sugar, cinnamon, nutmeg, and cornstarch. I’ve learned that mixing these ahead keeps the spices from clumping later. It’s a small step, but it makes a big difference for your Homemade Apple Pie Filling.
Step 3: Cook the Base
Grab a large pot or Dutch oven, toss in your apples, and pour the sugar-spice mix over them. Add the water, stir gently, and heat over medium. Keep stirring now and then—I’ve burned the bottom once by getting distracted, and it’s not fun to clean up!
Step 4: Simmer to Perfection
Let it simmer for about 10-12 minutes until the apples soften but still hold some bite. You don’t want mush! The sauce should thicken into a glossy syrup—pure magic for Homemade Apple Pie Filling.
Step 5: Finish with Flair
Take it off the heat and stir in the vanilla extract. Let your Homemade Apple Pie Filling cool a bit before using it in a pie or storing it. I always sneak a spoonful straight from the pot (don’t judge me!).
Step 6: Use or Store
Once cooled, you’re ready to use this Homemade Apple Pie Filling in a pie, or jar it up for later. I’ve got storage tips coming up, so hang tight if you’re not baking right away.
Nutritional Information
I’m no dietitian, but I think it’s helpful to know what’s in your Homemade Apple Pie Filling, especially if you’re watching your intake. This is based on a rough estimate per cup of filling, so keep that in mind. Here’s the scoop for my recipe.
- Calories: 180 per cup
- Fat: 0.5g
- Protein: 0.3g
- Carbohydrates: 46g
- Sodium: 5mg
I don’t stress too much over the numbers since Homemade Apple Pie Filling is a treat, but it’s nice to have an idea!
Healthier Alternatives
If I’m watching my sugar or trying to lighten up my Homemade Apple Pie Filling, I’ve swapped out a few things with pretty tasty results. It’s all about balance, right? Here are some tweaks I’ve made to keep this treat a bit healthier without losing that cozy flavor of Homemade Apple Pie Filling.
- Less Sugar: Cut the granulated sugar to 1/2 cup and add a touch of stevia or monk fruit sweetener. It still tastes great in my Homemade Apple Pie Filling.
- No Cornstarch: Use 1 tablespoon of tapioca starch instead if you’re avoiding corn products. I’ve done this for a friend with allergies, and it worked like a charm.
- Apple Boost: Skip added sweeteners altogether and rely on naturally sweeter apples like Fuji. I’ve tried this, and it’s not as decadent but still yummy.
- Cinnamon Overload: Bump up the cinnamon to 1.5 teaspoons to enhance flavor without extra calories. It’s my sneaky trick for a lighter Homemade Apple Pie Filling.
Serving Suggestions
I love finding new ways to enjoy my Homemade Apple Pie Filling beyond just pie—though don’t get me wrong, a classic pie is hard to beat! Here are some ideas based on how I’ve served it at home. Each one makes this Homemade Apple Pie Filling shine in its own way.
- Classic Pie: Use it as the star of a double-crust apple pie with a flaky crust. It’s my go-to for Thanksgiving.
- Breakfast Treat: Spoon warm Homemade Apple Pie Filling over pancakes or waffles. My kids go nuts for this on weekends!
- Dessert Quickie: Pair with a scoop of vanilla ice cream for an instant sweet fix. I’ve done this way too often after dinner.
- Pastry Pockets: Fill puff pastry or crescent rolls with Homemade Apple Pie Filling for handheld goodies. Perfect for potlucks, in my opinion!
Common Mistakes to Avoid
I’ve made my fair share of blunders with Homemade Apple Pie Filling over the years, so let me save you some trouble. Trust me on this one, learning the hard way isn’t fun! Here are pitfalls to dodge when making your own Homemade Apple Pie Filling.
- Overcooking Apples: Don’t let them turn to applesauce on the stove. I did this once, and my pie was more like pudding—yuck!
- Skipping Lemon Juice: Without it, the apples brown fast and lack zing. I forgot it early on, and the Homemade Apple Pie Filling was blah.
- Too Much Sugar: Taste as you go; overly sweet filling kills the apple vibe. I’ve overdone it before and regretted it.
- Not Stirring Enough: The bottom can scorch if you’re not careful. Learned this during a phone call distraction with my Homemade Apple Pie Filling!
Storing Tips
I’ve found that Homemade Apple Pie Filling keeps really well if you store it right, which is awesome for prepping ahead. In my experience, these methods work best. Here’s how to keep your Homemade Apple Pie Filling fresh.
- Refrigerator: Store in an airtight container or jar for up to 5 days.
- Freezer: Freeze in portioned freezer bags for up to 6 months. I label mine with dates!
- Canning: Process in a water bath for long-term storage if you’re into preserving Homemade Apple Pie Filling.

Frequently Asked Questions
I get a lot of questions about Homemade Apple Pie Filling, so I’ve rounded up the most common ones. Let’s dive in!
Can I use any type of apple?
Yep, pretty much! I usually mix tart and sweet ones like Granny Smith and Honeycrisp for balance in my Homemade Apple Pie Filling. Softer apples like McIntosh might get mushy, though, so keep that in mind.
How do I know when it’s thick enough?
When it coats the back of a spoon without running off too fast, you’re good. I’ve messed this up before by rushing it—just give it a few extra minutes if it’s too watery.
Can I make it ahead of time?
Absolutely, that’s the beauty of Homemade Apple Pie Filling! I often make a big batch and store it in the fridge or freezer for quick desserts. Check my storing tips above for details.
Is it safe to can this filling?
Yes, if you follow proper canning methods. I’ve canned Homemade Apple Pie Filling using a water bath canner—just be sure to add extra lemon juice for acidity and follow USDA guidelines.
Can I reduce the sugar?
For sure! I’ve cut it down when I’m watching sweets, and it still tastes great. Adjust to your liking with your Homemade Apple Pie Filling.
What if my filling is too runny?
No worries, just simmer it a bit longer to evaporate extra liquid. Or add a tiny slurry of cornstarch and water if you’re in a hurry—I’ve done that in a pinch.
Can I use this for other desserts?
Heck yeah! I’ve used it in crumbles, turnovers, even as a topping for cheesecake. Homemade Apple Pie Filling is super versatile.
How many pies does this make?
This recipe usually fills one deep-dish 9-inch pie. I’ve stretched it to two smaller ones before by adding a few extra apples, though.
Conclusion
I hope you’re as excited as I am to whip up some Homemade Apple Pie Filling! There’s nothing like the smell of apples and cinnamon filling your kitchen, and I can’t wait for you to try this out. Whether it’s for a pie or a sneaky spoonful straight from the jar, this Homemade Apple Pie Filling recipe is a keeper—trust me, your family will thank you!
Conclusion
I hope you enjoyed this recipe for Homemade Apple Pie Filling ! It’s truly one of my favorites, and I’m confident you’ll love it too.
Remember to follow the steps carefully for the best results. Don’t hesitate to experiment with your own variations and make this recipe your own. Happy cooking!