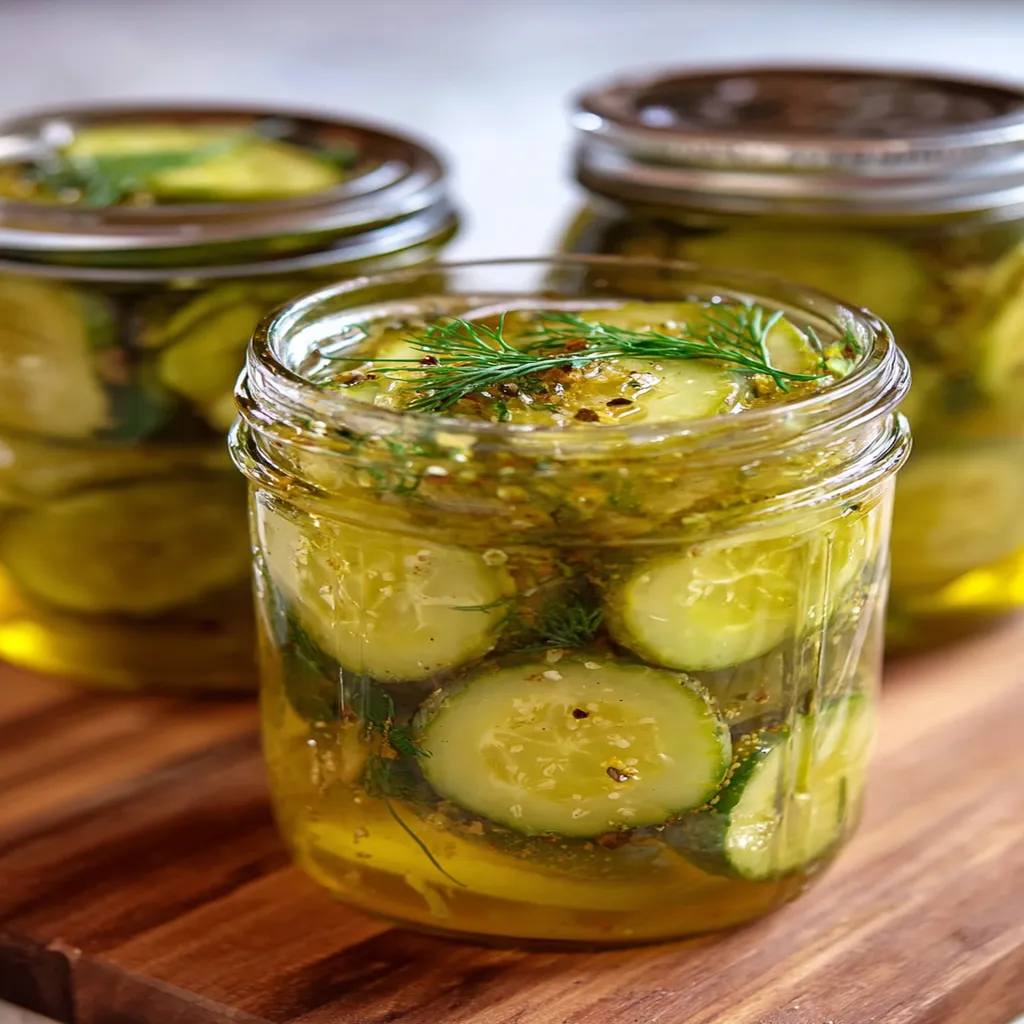
The 11 Best Steps to Make Savory Crunchy Dill Pickle Recipe
I still remember the first time I tried my hand at making a Crunchy Dill Pickle Recipe. It was a hot summer afternoon, and I’d just picked up a giant haul of cucumbers from the local farmer’s market, determined to preserve that fresh, snappy bite. My kitchen turned into a vinegar-scented chaos zone, but oh, the satisfaction of hearing that crisp crunch when I bit into my first homemade pickle was worth every spilled drop!
Fast forward a few years, and I’ve fine-tuned my Crunchy Dill Pickle Recipe into something I’m darn proud of. My family can’t get enough of it, and I’m thrilled to share it with you. If you’ve ever wanted to whip up a batch of pickles that rival the best deli jars, stick with me! For more recipes like this, check out garlic parmesan pasta.
And honestly, there’s nothing like opening a jar of your own Crunchy Dill Pickle Recipe on a gloomy day—it’s like bottling up summer itself. Let’s dive into how you can make this magic happen in your own kitchen.
Why You’ll Love This Recipe
I’ve found that my Crunchy Dill Pickle Recipe is a total game-changer for anyone who loves a tangy, crisp snack. There’s something so rewarding about transforming simple cucumbers into a jar of pure nostalgia, and the flavor? It’s a punchy balance of dill, garlic, and vinegar that hits all the right notes.
In my kitchen, this Crunchy Dill Pickle Recipe has become a staple for barbecues, sandwiches, or just sneaking a few straight from the jar (guilty as charged!). It’s beginner-friendly, customizable, and, trust me, way better than store-bought. Plus, it’s a fun way to flex your preserving skills!
Ingredients List
Let’s talk about what goes into crafting the perfect Crunchy Dill Pickle Recipe. I’m a stickler for fresh, quality ingredients because they make all the difference in getting that signature snap and flavor. Here’s what I use, with a few personal notes on my preferences.
I usually buy my cucumbers from local markets for the freshest pick, but any firm, small-to-medium cukes will do. And don’t skimp on the dill—it’s the heart of this Crunchy Dill Pickle Recipe! For another great variation, check out creamy dill pickle potato salad recipe.
For the Pickles
- 3 pounds small-to-medium cucumbers, fresh and firm for max crunch
- 2 cups white vinegar, 5% acidity for safe preserving
- 2 cups water, filtered if your tap water tastes funky
- 2 tablespoons pickling salt, not table salt—trust me on this
- 4 cloves garlic, peeled and smashed for a bold kick
- 4 heads fresh dill, or 2 tablespoons dried if fresh isn’t available
- 1 teaspoon mustard seeds, for a subtle pop of flavor
- 1 teaspoon black peppercorns, whole for a hint of spice
For the Jars
- 4 pint-sized canning jars, sterilized and ready to roll
- Lids and bands, new lids for a proper seal
These ingredients are the backbone of a stellar Crunchy Dill Pickle Recipe. Adjust the garlic or spices to your taste, but I’ve found this combo nails it every time.
Variations
One thing I adore about my Crunchy Dill Pickle Recipe is how easy it is to tweak. Over the years, I’ve played around with different flavors based on what’s in my pantry or what my friends request. Here are some variations that have worked wonders in my kitchen—feel free to experiment with your own twist on this Crunchy Dill Pickle Recipe!
I’ve tried a few of these myself, and let me tell you, they’ve been crowd-pleasers. Whether you’re a spice fiend or prefer a sweeter vibe, there’s a version of this Crunchy Dill Pickle Recipe for everyone.
- Spicy Kick: Toss in a sliced jalapeño or 1/2 teaspoon red pepper flakes per jar for some heat that builds.
- Garlic Lover’s Dream: Double the garlic cloves to 2 per jar—my husband can’t get enough of this one!
- Sweet and Tangy: Add 1 tablespoon of sugar to the brine for a milder, bread-and-butter pickle vibe.
- Herby Twist: Mix in a sprig of fresh thyme or rosemary alongside the dill for an earthy note.
- Smoky Edge: A pinch of smoked paprika in each jar adds a unique depth—I stumbled on this by accident and loved it.
- Turmeric Glow: Sprinkle in 1/4 teaspoon turmeric for a vibrant color and subtle warmth.
- Bay Leaf Boost: Drop a small bay leaf in each jar for an aromatic layer that’s hard to pin down.
- Mustard Magic: Upping the mustard seeds to 1 teaspoon per jar gives a sharper bite—my kids always ask for this Crunchy Dill Pickle Recipe variation!
Servings and Timing
In my experience, timing is everything when whipping up a Crunchy Dill Pickle Recipe. I’ve got the process down to a science after many batches, so here’s the breakdown for how long it’ll take you. This recipe makes enough to share—or hoard, if you’re like me!
- Prep Time: 20 minutes
- Cook Time: 10 minutes (for the brine)
- Total Time: 30 minutes (plus a few weeks for pickling)
- Servings: 4 pint jars, about 16-20 pickle spears depending on size
I usually set aside an afternoon to make my Crunchy Dill Pickle Recipe, and the wait for them to pickle is the hardest part. But trust me, it’s worth it!
Step-by-Step Instructions
Let’s get into the nitty-gritty of making this Crunchy Dill Pickle Recipe. I’m gonna walk you through each step as if we’re chatting in my kitchen. I’ve got a few tricks up my sleeve to ensure that perfect snap, so let’s roll!

Step 1: Prep Your Gear and Cukes
First things first, wash those cucumbers under cold water and trim off the blossom ends—that’s the little nub where the flower was. I learned the hard way that leaving it on can make pickles mushy due to enzymes. Sterilize your jars and lids by boiling them for 10 minutes, then keep ‘em warm until you’re ready to pack.
Step 2: Pack the Jars
Now, stuff each jar with cucumbers—cut into spears or left whole, whatever floats your boat. I like spears for easy snacking. Add a head of dill, a smashed garlic clove, and a pinch of mustard seeds and peppercorns to each jar for that classic Crunchy Dill Pickle Recipe flavor.
Step 3: Make the Brine
In a pot, combine vinegar, water, and pickling salt, then bring it to a rolling boil. Stir until the salt dissolves completely. I’ve burned a batch before by not watching the pot, so keep an eye on it—this brine is the soul of your Crunchy Dill Pickle Recipe!
Step 4: Fill and Seal
For another great variation, check out dill pickle shots.
Pour the hot brine over the cucumbers, leaving about 1/2 inch of headspace at the top. Wipe the jar rims with a clean cloth (don’t skip this—grease can ruin the seal), then pop on the lids and screw the bands fingertip-tight. This step always makes me feel like a pro preserving wizard.
Step 5: Process the Jars
Lower the jars into a boiling water bath, making sure they’re covered by at least an inch of water. Process for 10 minutes, then carefully lift them out and let them cool on a towel. Hearing those lids “pop” as they seal is music to my ears with every Crunchy Dill Pickle Recipe batch!
Step 6: Wait and Enjoy
Here’s the tough part—let the jars sit for at least 2-4 weeks in a cool, dark spot to develop that full flavor. I’ve snuck a jar open early before, and while it’s tasty, the wait really perfects this Crunchy Dill Pickle Recipe. Store any unsealed jars in the fridge and dig in!
Nutritional Information
Another great option is air fryer buffalo wings.
I’m no dietitian, but I’ve looked into the basics of what’s in my Crunchy Dill Pickle Recipe, and it’s a pretty guilt-free snack. Pickles are low in calories but pack a sodium punch, so keep that in mind if you’re watching your intake. Here’s the rough breakdown per serving (about 2 spears).
- Calories: 10 per serving
- Fat: 0g
- Protein: 0.5g
- Carbohydrates: 2g
- Sodium: 600mg
I love that this Crunchy Dill Pickle Recipe is light enough to munch on without worry, though I usually balance it with less salty meals on pickle-heavy days!
Healthier Alternatives
For another great variation, check out sweet sour sauce recipe.
If you’re looking to tweak this Crunchy Dill Pickle Recipe for a healthier twist, I’ve got some swaps I’ve tried over the years. When I’m watching my salt intake or just wanna mix things up, these options keep the flavor without the guilt. Let’s talk tweaks for a lighter Crunchy Dill Pickle Recipe.
- Low-Sodium Brine: Cut the pickling salt in half and replace with a bit of lemon juice for tang—I’ve done this and it still works.
- Vinegar Swap: Use apple cider vinegar instead of white for added nutrients and a fruitier note.
- No-Sugar Option: If you’re avoiding processed stuff, skip any sugar in sweet variations and let the natural cuke flavor shine.
- Extra Veggies: Toss in carrots or green beans with the cucumbers for more variety and fiber—my latest Crunchy Dill Pickle Recipe batch had this and it was a hit!
Serving Suggestions
I love finding new ways to enjoy my Crunchy Dill Pickle Recipe, and over time, I’ve come up with some killer pairings. Whether it’s a casual lunch or a backyard cookout, these ideas elevate the experience. Here are my go-to serving tips for this Crunchy Dill Pickle Recipe!
- Burger Buddy: Slice these pickles and layer them on a juicy burger for the perfect tangy crunch.
- Charcuterie Star: Add a small bowl of pickle spears to a cheese board—my friends always rave about this.
- Sandwich Sidekick: Serve alongside a deli sandwich or grilled cheese for a classic combo.
- Snack Solo: Honestly, I just grab a spear straight from the jar for a quick, satisfying bite of Crunchy Dill Pickle Recipe goodness.
Common Mistakes to Avoid
I’ve botched my fair share of batches while perfecting this Crunchy Dill Pickle Recipe, so let me save you some headaches. Trust me, I learned the hard way on a few of these, and I don’t want you to repeat my flops. Here are pitfalls to dodge with your Crunchy Dill Pickle Recipe.
- Soft Cucumbers: Using overripe or large cukes leads to mushy pickles—stick to small, firm ones.
- Skipping Sterilization: I skipped jar sterilization once, and mold ruined the batch. Don’t risk it!
- Wrong Salt: Table salt can cloud the brine and mess with texture—always use pickling salt for a true Crunchy Dill Pickle Recipe.
- Impatient Tasting: Eating them too soon means flat flavor—give it at least 2 weeks, even if it kills you (it killed me!).
Storing Tips
I’ve found that storing your Crunchy Dill Pickle Recipe jars right makes all the difference in keeping that crispness alive. In my experience, a little care goes a long way. Here’s how I keep mine fresh. I was inspired by stuffed banana baked smores recipe when creating this recipe.
- Pantry Storage: Sealed jars last up to a year in a cool, dark place—perfect for stocking up.
- Refrigerator: Once opened, store in the fridge for 1-2 months to maintain that Crunchy Dill Pickle Recipe snap.
- Avoid Sunlight: Keep jars out of direct light to prevent flavor loss or spoilage.

Frequently Asked Questions
I get a ton of questions about my Crunchy Dill Pickle Recipe, so let’s tackle the most common ones. I’ve answered these based on my own trials and errors, so hopefully, they help you out. Here we go!
Can I use regular table salt instead of pickling salt?
I was inspired by easy ham and pickle appetizer rolls recipe when creating this recipe.
Nope, I wouldn’t recommend it. Table salt often has additives that can cloud the brine or affect the texture of your Crunchy Dill Pickle Recipe. Stick to pickling salt for the best results—it’s pure and made for this!
How long do I need to wait before eating these pickles?
You’ll want to wait at least 2-4 weeks for the flavors to fully meld. I’ve jumped the gun before, and they’re okay early, but patience pays off with this Crunchy Dill Pickle Recipe.
Can I reuse the brine for another batch?
I don’t advise it, honestly. The brine loses its potency after the first round, and safety-wise, it’s risky. Make a fresh batch for each Crunchy Dill Pickle Recipe attempt.
Why are my pickles soft instead of crunchy?
Oh, I’ve been there! Usually, it’s from using old cucumbers or not trimming the blossom end. Fresh, firm cukes are key to a Crunchy Dill Pickle Recipe.
Can I add more garlic?
Heck yeah, go for it! I often double the garlic myself for an extra punch. Just adjust to your taste.
Do I have to use a water bath canner?
For long-term storage, yes, it’s safest to process the jars in a boiling water bath. I’ve skipped it for fridge pickles, though, if I’m eating them quick.
Can I use dried dill instead of fresh?
Absolutely, I’ve done it plenty of times. Use about 1.5 teaspoons of dried dill per jar if fresh isn’t an option—it still works great.
Are these pickles safe to eat if the lid doesn’t pop?
If the lid doesn’t seal (no “pop” sound), store that jar in the fridge and eat it within a month. Don’t risk pantry storage without a proper seal.
Conclusion
You might also want to try slimming detox water.
I’m so excited for you to try this Crunchy Dill Pickle Recipe and experience the joy of homemade pickles. There’s nothing quite like that first crunchy bite, and I hope my tips help you nail it on your first go. Grab some cucumbers, dive into this Crunchy Dill Pickle Recipe, and let me know how it turns out—I’d love to hear your stories!